- How do I test exposure?
Stouffer 21 Step Transmission Guide distributors
Exposure Math with a 21 Step Stouffer Guide
Direct Emulsion and CDF Direct Films
Indirect Films - Why do fine lines close up?
- What distance should my lamp be?
- Image doesn't wash out
Q1: How do I test exposure?
Measuring UV Exposure
It is the primary job of the screen maker to learn how to judge exposure.
Invisible UV energy reacts with emulsion sensitizer and hardens the stencil
so it won't dissolve with water and rinse down the drain. You block UV energy
with a positive during exposure so the image area dissolves when you develop
the stencil with water.
Screen makers can only expose one side of the stencil, so it is important for the UV energy to move through the stencil, all the way to the back, where the squeegee blade will rub the stencil where it is weakest.
When the stencil doesn't hold in the mesh, it didn't get enough exposure. Start by checking the suggested exposure time on the product Technical Data Sheet. These estimated time charts are based on known commercial screen printing UV light sources on 305 mesh. You can measure your lamp with two exposures using a Stouffer 21 Step Scale to measure the stencil hardness, then refine your exposure with an exposure calculator.
Stouffer T2115 21 Step
![]() Stouffer T2115 21 Step Transmission Test Positive - Visual Feedback
Stouffer T2115 21 Step Transmission Test Positive - Visual Feedback
 The best exposure test for basic exposure hardness is a Stouffer
21 Step Transmission Gray Scale, a 5.5" camera film positive
opaque at one end, and clear at the other, with 21 steps in between. The
21 steps simulate 21 different exposures and you get visual feedback to
make clear judgements without guessing. Put a 21 Step on every stencil you
expose for the rest of your life.
The best exposure test for basic exposure hardness is a Stouffer
21 Step Transmission Gray Scale, a 5.5" camera film positive
opaque at one end, and clear at the other, with 21 steps in between. The
21 steps simulate 21 different exposures and you get visual feedback to
make clear judgements without guessing. Put a 21 Step on every stencil you
expose for the rest of your life.
Stouffer 21 Step Transmission Guide distributors
 DIRECT
EMULSIONS and CDF DIRECT-FILMS - Solid Step 7
DIRECT
EMULSIONS and CDF DIRECT-FILMS - Solid Step 7
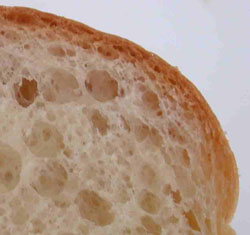
When you develop the stencil, areas that didnt get enough exposure to survive development will dissolve with water and rinse down the drain. You want a minimum of a Solid Step 7 that survives and holds in the mesh. More exposure will make your stencil more durable and less will make the stencil less durable.
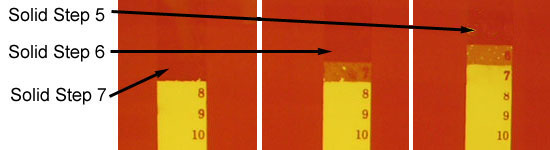
Stouffer 21 Step for establishing a MINIMUM exposure with a Solid Step 7 on direct stencils exposed on the mesh
The guide numbers are clear on the film so they get 100% exposure. You will know you have a Solid Step, because you won't see a difference between the guide number, (7), and the patch of stencil around it. If you have a 'crusty' step, you know that unexposed stencil on the inside of the screen has broken down and washed away with water. Not Solid!
The great thing about a Stouffer 21 Step Transmission Gray Scale is that it only costs from US$6.00 to US$12.00 and should last a lifetime. The 21 Step is a real photographic positive with 21 steps of opacity that simulates 21 different exposures - with one exposure. Much faster than than a manual step test, where you have to move a piece of cardboard or Rubylith to block UV energy.
Exposure
Math for Stouffer Transmission Gray Scale
You can use math to calculate an exposure correction because the amount
of each step is a known amout. Each step to increase or decrease exposure
has a value of 1.414. If you need to adjust more than one step, you have
to multiply the steps. It's logarithmic.
 1 step is 1.414 exposure
2 steps 1.414 * 1.414 = 1.9999 so you should double exposure.
3 steps 1.414 * 1.414 * 1.414 = 2.827 means about 3x exposure.
4 steps 1.414 * 1.414 * 1.414 * 1.414 = 3.99758 which means 4X.
See, it makes sense.
Use a 21 Step on every screen for visual feedback
You will get visual feedback of the invisible, UV energy that cross links your stencil when you put a transmssion gray scale on every stencil. You will notice when it washes out differently and you will know your lamp or stencil has changed. You will know when to change your exposure to get back to a minimum Step 7.
For visual feedback like a Step Speedometer, put a 21 Step on every screen you expose for the rest of your life.
Stouffer 21 Step Transmission Guide distributors
INDIRECT
FILMS - Surviving Step 6
 Indirect
films are processed off the mesh, so they require a balance of hard and
soft so they will adhere to the mesh after development. Too much exposure
and they will harden, but not stick. Not enough and the will dissolve and
rinse down the drain. Each step on a Stouffer 21 Step scale will be a different
color. Aim for a 'surviving' Step 6. No 7 step, and darker
steps as the guide number decrease.
Indirect
films are processed off the mesh, so they require a balance of hard and
soft so they will adhere to the mesh after development. Too much exposure
and they will harden, but not stick. Not enough and the will dissolve and
rinse down the drain. Each step on a Stouffer 21 Step scale will be a different
color. Aim for a 'surviving' Step 6. No 7 step, and darker
steps as the guide number decrease.
Underexposed: Look for a lighter color. Stencil will
be thin (and look thin) resulting in poor press endurance. Underexposing
for resolution sacrifices durability.
Overexposed: Stencil will be thick (and look thick) resulting
in poor adhesion due to over hardening. 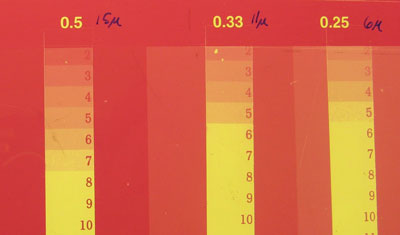
Ink
and Clean Up Solvent Resistance
Solvent resistance and run length are improved as exposure is increased. Select the highest exposure that will give you the resolution you actually need for the job you will print.
Forget the smallest lines and letters on test positives unless your work really involves lines or letters of that size. For calibrating exposure and artwork for fine line printing please read "Why do fine lines close up?"
Underexposing for resolution much finer than you need, can sacrifice durability. Remember to make a new test whenever you change your mesh count, mesh color, or coating procedure.
Q2:
Why do fine lines close up?
Before an Exposure Calculator
You have to find an acceptable exposure before you can use an exposure calculator that brackets that exposure with 2 steps under and 2 steps over exposure, so you can judge the fineness of line you can print.
The minimum exposure to cross link emulsion so water won't dissolve it and it holds in the mesh, is a Solid Step 7. More exposure will make the stencil more durable (harder), but light scatter in the mesh and diffused light from a longer exposure, can under cut the positive, and choke the final image size.
Undercutting
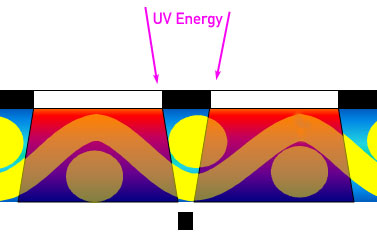
UV energy from any lamp, but especially from banks of fluorescent lamps
comes at your fine line positive from the left and right. It hardens your
stencil at an angle which chokes the size of your printed dot.
Compensate
 The
problem shows up with halftones and fine lines under 0.030". It may turn
out you have to make a line 0.040" to that you actually print a line 0.030"
and you have couquered Mother Nature's attempt to frustrate you.
The
problem shows up with halftones and fine lines under 0.030". It may turn
out you have to make a line 0.040" to that you actually print a line 0.030"
and you have couquered Mother Nature's attempt to frustrate you.
Don't under expose, so you can hang on to fine lines that close up, because of undercutting, because you will have a stencil that is not completely cross linked and will break down on the press. You must outwit Mother Nature and calibrate all halftones and finelines to compensate for this choking or stencil failure
Add Known Controls to your Positive
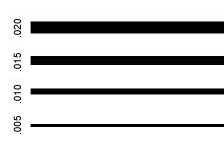
Add simple lines of a known width to your positive and use that positive
to MEASURE the result on your final screen print.
Large block letters - Who cares?
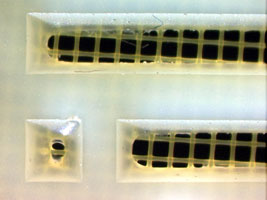
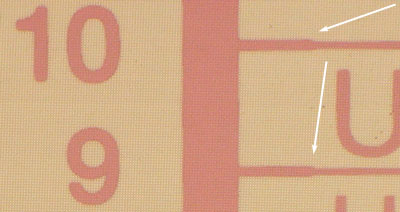 The right side was exposed to more UV energy than the left. Notice how the lines are choked.
Line choked when exposed to different amounts of UV energy
Q3:
What distance should my lamp be?
Inverse square law
A certain volume of UV energy falls on a specific square foot - one foot
from the lamp
That same amount of light has to cover
hot spots
Q4: Why doesn't my image wash out
Doesn't stay in the mesh
Emulsion is easy. If the stencil washes out - it wasn't exposed with enough
UV-A energy, the sensitizer is not crosslinked and the stencil dissolves with water and rinses
down the drain - just like it is supposed to.
Image area doesn't wash out
If the image area doesn't dissolve and rinse down the drain, the
sensitizer was somehow crosslinked with heat or UV-A energy. This usually
means your positive failed to stop UV energy from reaching
the stencil like a bad umbrella.
We often get calls from people that wash outside or actually apply the positive outside, and aren't thinking about the tremendous invisible UV energy of the sun.
Dime Complete Opacity Test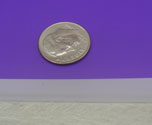
To judge if your positive completely stops UV energy, tape a dime, different thicknesses of wire or a piece of aluminum foil to the stencil and after exposure compare how the area covered by the dime washes out compared to the dark areas of your positive.
If the area covered by the dime doesn't wash out, you have exposed the stencil to UV energy or heat energy before you exposed with a positive 'crusted' the stencil.
Positive Failure
Test to make sure the emulsion actually will dissolve
Wash fresh stencil with no exposure
Crust - A little bit of exposure, but not enoutgh penetration to cross link the entire thickness.
Positive Failure and Fine Line Test Pattern
Evaluating Light Sources
Fiat lux! (“Let there be light!”), one of the earliest proclamations in the Book of Genesis, should be one of your first considerations in the creation of photographic stencils. Light sources have three main attributes. Insofar as a light source optimizes each attribute or not, it will produce stencils ranging from superb to poor.
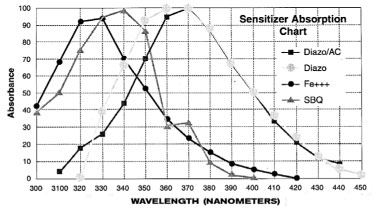
SPECTRAL OUTPUT
The wavelengths of light, or spectral output, of an exposure source should
match closely the spectral sensitivity of photo stencil materials. The closer
the match-up, the more efficient the light source, and the better it will “cure” or
cross-link the molecules of the stencil material, so that the stencil will
be more durable. The common sensitizers used in photo films and emulsions have
specific sensitivity ranges, as shown on the “Sensitizer Absorption Chart” (below).
It’s a common misconception that photographic stencil materials are “UV-sensitive.” In
fact, they are sensitive to light ranging from upper-ultra-violet through the
visible blue part of the spectrum. (That’s why yellow lights make good
safelights, because photo stencil materials don’t react to the longer
wavelengths of yellow.)
LIGHT INTENSITY
Photo stencil materials, even those comparatively fast ones formulated for projection exposure, are not nearly as fast exposing or sensitive as camera film. If photographic stencil materials were made that fast, they would be virtually impossible to protect from “pre-exposure.” Thus, light sources need the power, the intensity, to expose stencils in a reasonably productive amount of time.
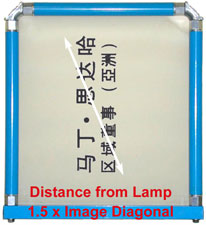
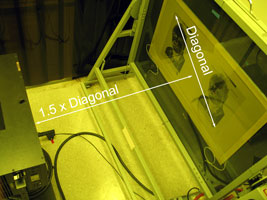
LIGHT GEOMETRY
Light geometry concerns the angle of incidence of light rays as they strike the artwork and pass through its “clear” portions into the photo stencil material. Light rays emitted from a small area or “point source”--at a minimum distance of 1½ times the diagonal of the stencil--are more nearly perpendicular as they meet the artwork and stencil (“Perpendicular Light Incidence,” back page). This affords better transfer of image and non-image information from the artwork into the photo stencil material.
By contrast, with a widely dispersed light source such as fluorescent tubes, light rays enter the stencil material at oblique angles, quite literally angled behind the dark edges of the artwork, reducing the fine detail or resolution of the stencil (“Wide Angle Incidence”).
We categorize light sources according to how well they provide the three key
exposure attributes. The highest quality light sources are metal halide or
carbon arc. Mercury vapor and pulsed xenon are of medium quality. Quartz lamps,
fluorescent tubes. Grolites®, fotoflood bulbs, etc. have problematic deficiencies,
though they can be quite adequate for low resolution work, or in shops that
don’t need high stencil throughput.
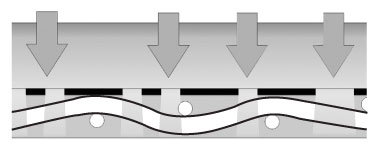 "Perpendicular" Light
Incidence
"Perpendicular" Light
Incidence
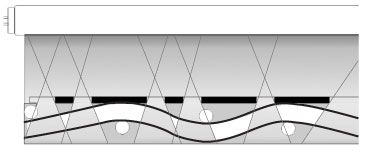 Wide
Angle Incidence (fluorescent tube unit, top)
Wide
Angle Incidence (fluorescent tube unit, top)
All is not lost if you have a poor light source, but you will have to work
smart to compensate for it, and understand and accept the limitations imposed
by it. For help in making the most of your light source, contact Ulano Technical
Services, Brooklyn, at 1-800-221-0616. Fiat lux!
D-max, D-min, and De-lineation: Evaluating Artwork
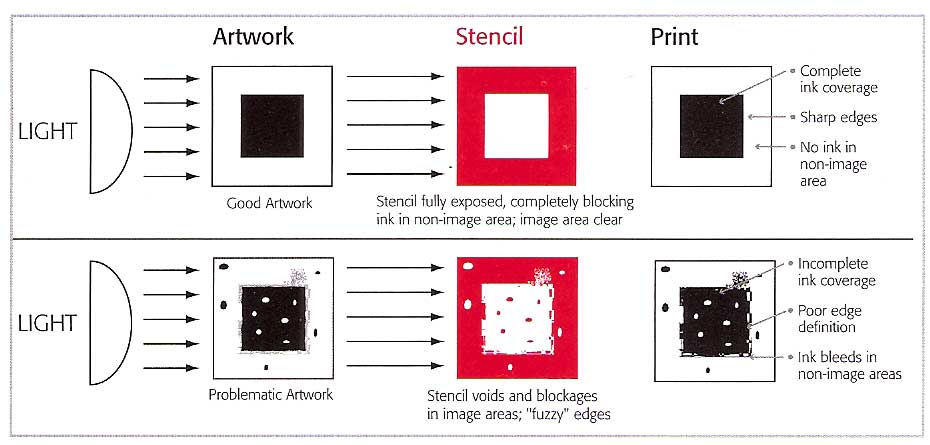
By artwork, we mean any imaged media placed between a light source and photo-stencil film or emulsion during exposure. Most photographic stencils are contact exposed in a vacuum frame, so the dimensions of the artwork are the same as those of the stencil and the final print. Image setter-exposed silver film (right-reading photographic positives*), laser toner (usually on vellum), inkjet on inkjet film, thermal images, and knifecut masking film (Rubylith® brand)all are commercial media used for contact exposure.**
The essence of screen printing is a stencil that blocks the flow of ink to non-image areas of the print and is open in image areas, allowing ink to flow freely through the fabric. The integrity of the stencil material and the uncompromised openness of the image areas are equally essential. In addition, there should be a clear demarcation between image and non-image areas. These attributes originate with the artwork.
Photo stencils can never be better than the artwork
used to generate them, nor can the final print be better than the stencil. If the dark areas of the artwork lack sufficient density*** to block light during exposure, or if they contain pinholes or thin spots, stencil material will harden in what should be the open, image areas of the stencil, and ink will not flow readily through the image areas of the stencil during printing. Similarly, if clear areas of the artwork are, at best, translucent rather than transparent, or contain artifacts such as dirt or dust, light energy will be filtered or blocked before it reaches the stencil material; non-image areas of the stencil wont be fully cured or cross-linked and may break down during the printing run. Finally, if the delineation of image and non-image areas is pixilated, fuzzy, or lacking in acutance (edge sharpness or definition),
so will the image edges on the final print.
*Any text or other information should
be on the emulsion side of the positive and appear as you will want it to look
on the final print; the emulsion side of the positive is placed against the stencil
material during exposure.
**Projection exposure requires silver film positives that are considerably
smaller than the final size of the print. Such positives must be of very
good quality, as projection by its nature enlarges imperfections. Computer-to-screen systems dont use artwork as weve defined it here. These systems either apply an image in inkjet wax directly to the stencil material (inkjet CTS) or utilize Texas Instruments digital light processing (DLP®) system to expose a screen pixel by pixel (digital direct exposure).
***The dark and clear areas of artwork can be measured on a densitometer. The opacity of the dark areas is referred to as D-max (maximum density) followed by the numeric densitometer reading. D-min refers to the minimum densitywhich
is a measure of the clarity of the artwork. D-max 4.0 is ideal for stencil
making, as it allows full exposure of non-image areas even if the artwork
medium is cloudy or fogged.