 All
Indirect System Photographic Films consist of a light-sensitive emulsion
affixed to a transparent base or backing sheet, with special adhesives.
Indirect Films are exposed, developed (except Pulsar and Ulanolux UP3),
washed out with skin temperature water and then adhered to a
screen.
All
Indirect System Photographic Films consist of a light-sensitive emulsion
affixed to a transparent base or backing sheet, with special adhesives.
Indirect Films are exposed, developed (except Pulsar and Ulanolux UP3),
washed out with skin temperature water and then adhered to a
screen.
Indirect films offer superior fine detail reproduction; sharp printing edges; uniform stencil thickness; predictable standardized exposures; close control of stencil thickness, hence ink deposit; fast and simple stencil production; and easy stencil removal for efficient mesh recovery. All Ulano gelatin-based Indirect Films are totally solvent resistant. The topcoat on Ulano Indirect Films prevents tackiness under conditions of heat and high humidity.
Ulanotips for Adhering Film
Adhesion can be improved slightly by leaving the completely blotted stencil undisturbed on the buildup board for several minutes before lifting it to complete the drying.
To promote good adhesion and to minimize contamination of the stencil by airborne dust, it is best to degrease and rinse the screen immediately before the adhering step. If (his is not practical, rinse the screen and let it drain just before washing out the film. Adhering the film to wetted mesh can also help to prevent scumming and for highly critical work, yields slight improvements in edge definition.
Evaluating Light Sources
Fiat lux! (“Let there be light!”), one of the earliest proclamations in the Book of Genesis, should be one of your first considerations in the creation of photographic stencils. Light sources have three main attributes. Insofar as a light source optimizes each attribute or not, it will produce stencils ranging from superb to poor.
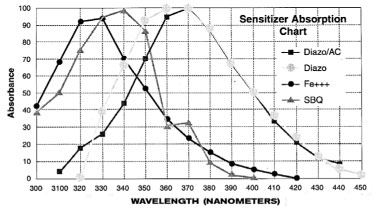
SPECTRAL OUTPUT
The wavelengths of light, or spectral output, of an exposure source should
match closely the spectral sensitivity of photo stencil materials. The closer
the match-up, the more efficient the light source, and the better it will “cure” or
cross-link the molecules of the stencil material, so that the stencil will
be more durable. The common sensitizers used in photo films and emulsions have
specific sensitivity ranges, as shown on the “Sensitizer Absorption Chart” (below).
It’s a common misconception that photographic stencil materials are “UV-sensitive.” In
fact, they are sensitive to light ranging from upper-ultra-violet through the
visible blue part of the spectrum. (That’s why yellow lights make good
safelights, because photo stencil materials don’t react to the longer
wavelengths of yellow.)
LIGHT INTENSITY
Photo stencil materials, even those comparatively fast ones formulated for projection exposure, are not nearly as fast exposing or sensitive as camera film. If photographic stencil materials were made that fast, they would be virtually impossible to protect from “pre-exposure.” Thus, light sources need the power, the intensity, to expose stencils in a reasonably productive amount of time.
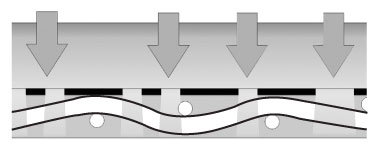
LIGHT GEOMETRY
Light geometry concerns the angle of incidence of light rays as they strike the artwork and pass through its “clear” portions into the photo stencil material. Light rays emitted from a small area or “point source”--at a minimum distance of 1½ times the diagonal of the stencil--are more nearly perpendicular as they meet the artwork and stencil (“Perpendicular Light Incidence,” back page). This affords better transfer of image and non-image information from the artwork into the photo stencil material.
By contrast, with a widely dispersed light source such as fluorescent tubes, light rays enter the stencil material at oblique angles, quite literally angled behind the dark edges of the artwork, reducing the fine detail or resolution of the stencil (“Wide Angle Incidence,” back page).
We categorize light sources according to how well they provide the three key
exposure attributes. The highest quality light sources are metal halide or
carbon arc. Mercury vapor and pulsed xenon are of medium quality. Quartz lamps,
fluorescent tubes. Grolites®, fotoflood bulbs, etc. have problematic deficiencies,
though they can be quite adequate for low resolution work, or in shops that
don’t need high stencil throughput.
 "Perpendicular" Light
Incidence
"Perpendicular" Light
Incidence
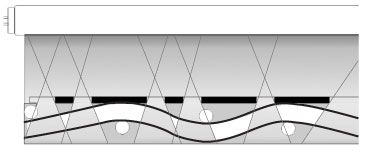 Wide
Angle Incidence (fluorescent tube unit, top)
Wide
Angle Incidence (fluorescent tube unit, top)
All is not lost if you have a poor light source, but you will have to work
smart to compensate for it, and understand and accept the limitations imposed
by it. For help in making the most of your light source, contact Ulano Technical
Services, Brooklyn, at 1-800-221-0616. Fiat lux!
D-max, D-min, and De-lineation: Evaluating Artwork
By artwork, we mean any imaged media placed between a light source and photo-stencil film or emulsion during exposure. Most photographic stencils are contact exposed in a vacuum frame, so the dimensions of the artwork are the same as those of the stencil and the final print. Image setter-exposed silver film (right-reading photographic positives*), laser toner (usually on vellum), inkjet on inkjet film, thermal images, and knifecut masking film (Rubylith® brand)all are commercial media used for contact exposure.**
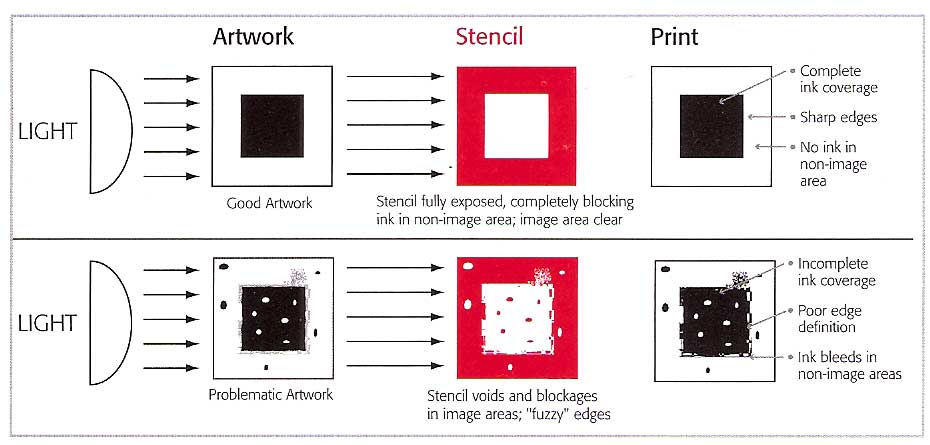
The essence of screen printing is a stencil that blocks the flow of ink to non-image areas of the print and is open in image areas, allowing ink to flow freely through the fabric. The integrity of the stencil material and the uncompromised openness of the image areas are equally essential. In addition, there should be a clear demarcation between image and non-image areas. These attributes originate with the artwork.
Photo stencils can never be better than the artwork
used to generate them, nor can the final print be better than the stencil. If the dark areas of the artwork lack sufficient density*** to block light during exposure, or if they contain pinholes or thin spots, stencil material will harden in what should be the open, image areas of the stencil, and ink will not flow readily through the image areas of the stencil during printing. Similarly, if clear areas of the artwork are, at best, translucent rather than transparent, or contain artifacts such as dirt or dust, light energy will be filtered or blocked before it reaches the stencil material; non-image areas of the stencil wont be fully cured or cross-linked and may break down during the printing run. Finally, if the delineation of image and non-image areas is pixilated, fuzzy, or lacking in acutance (edge sharpness or definition),
so will the image edges on the final print.
*Any text or other information should
be on the emulsion side of the positive and appear as you will want it to look
on the final print; the emulsion side of the positive is placed against the stencil
material during exposure.
**Projection exposure requires silver film positives that are considerably
smaller than the final size of the print. Such positives must be of very
good quality, as projection by its nature enlarges imperfections. Computer-to-screen systems dont use artwork as weve defined it here. These systems either apply an image in inkjet wax directly to the stencil material (inkjet CTS) or utilize Texas Instruments digital light processing (DLP®) system to expose a screen pixel by pixel (digital direct exposure).
***The dark and clear areas of artwork can be measured on a densitometer. The opacity of the dark areas is referred to as D-max (maximum density) followed by the numeric densitometer reading. D-min refers to the minimum densitywhich
is a measure of the clarity of the artwork. D-max 4.0 is ideal for stencil
making, as it allows full exposure of non-image areas even if the artwork
medium is cloudy or fogged.
Ulanotips for Low Humidify Conditions
-
Storage
- Gelatin films will not perform correctly if stored in humidity less than 30%.
- Use a humidifier to increase the storage area to an ideal of 50%
Under conditions of prolonged low humidity, ULANO Indirect System Photographic Films may become brittle. To restore flexibility to the coating, we recommend a glycerin treatment.

- Glycerin Treatment
- Mix 1 part of glycerin to 16 parts of water.
- During the adherng step, after at least two changes of newsprint, apply a liberal coating of the glycerin solution with cotton or a clean rag to the squeegee side of the screen.
- Wait five minutes.
- Finish blotting the screen with newsprint as usual.
- Place inexpensive humidifiers in the stencil making and printing areas of the shop, or install humidity control equipment.
|
||
| Problem | Possible Cause | Solution |
| Slow Drying | Improper blotting | Use newsprint pad; change bottom sheet 5 - 6 times |
| Poor air circulation | Use cool air fan | |
| Excessive relative humidity | Dehumidify drying area | |
| Emulsion delaminates during washout | Developer concentration low | Mix fresh Ulano A & B Developer; use correct size package and amount of water; use only Ulano brand developer |
| Developer too cold | Keep developer at room temperature. Cover developer tray to prevent cooling from evaporation. Put bottle filled with hot water in corner of tray. | |
| Washout temperature too high | Use thermometer. Water should feel a little warmer than body temperature | |
| Exposed through wrong side | Film should be exposed through backing sheet | |
| Underexposure | Perform Step Wedge Test; check age of bulb | |
| Poor adhesion | Improper mesh preparation | Degrease all mesh; roughen and degrease synthetics |
| mesh too coarse | Use finer mesh | |
| Over / underexposure | Perform Step Wedge Test | |
| Improper blotting | Use pad of newsprint and firm pressure. Use buildup board | |
| Excessive washout temperature | Use thermometer | |
| Excessive washout pressure | Use aerator nozzle | |
| Insufficient drying | Don't rush; don't use heat | |
| Pinholes | Underexposure | Perform Step Wedge Test; check light output |
| Dust | Clean positives, contact glass, film backing | |
| Poor adhesion | See above | |
| Particles in washout water | Use aerator nozzle, plus water prefilter or strainer | |
| Particles in ink | Avoid coarse frit or pigmented ink | |
| Moisture in thinner or washup solvent | Avoid condensation during solvent storage. Use best grade ink and solvent. | |
| Mesh too coarse for stencil details | Match mesh count to fineness of detail. | |
| Off-contact too high | Stretch mesh tight for proper snap at minimum off-contact. | |
| Poorly stretched mesh | Check proper mesh tension. | |
| Stencil brittleness | Stencil dried out | Humidify printing area in winter; use glycerine treatment. |
| Poor resolution (loss of detail) | Poor vacuum contact | Check vacuum; use board behind film in soft-blanket vacuum frame. |
| Light reflectance | Use black backup sheet behind film if vacuum frame blanket is of light color. | |
| Poor light source | Upgrade light source. | |
| Poor positives | Check optical density, especially with pen or airbrush positives. | |
| Light too close | Minimum exposure distance should be at least 1½ times image diagonal. Increase exposure distance. | |
| Overexposure | Perform Step Wedge Test. | |
| Poor washout | Check washout procedure - duration, pressure, and temperature. | |
| Poor definition (edge sharpness) | Insufficient washout | Wash out thoroughly and chill. |
| Heat from light source | Increase exposure distance. | |
| Improper developing | Check developer concentration. | |
| Excessive drying heat | Use cool air only. | |
| Positive oriented incorrectly | Emulsion side of positive must contact film backing during exposure. | |
| Excessive blotting pressure | Blot gently with a pad of newsprint. | |
| Underexposure | Perform Step Wedge Test | |
| Stencil cracking or brittleness | Low humidity | Humidify work area; use glycerin treatment |
| Excessive drying heat | Use cool air only. | |
| Excessive off-contact | Stretch mesh better. | |
| Marginal adhesion | See Poor Adhesion above. | |
| Overexposure | Measure indirect film exposure with a Stouffer 21 Step scale to a surviving step 6 | |